Presentation
FreeIPA stands for Free Identity Policy Audit.
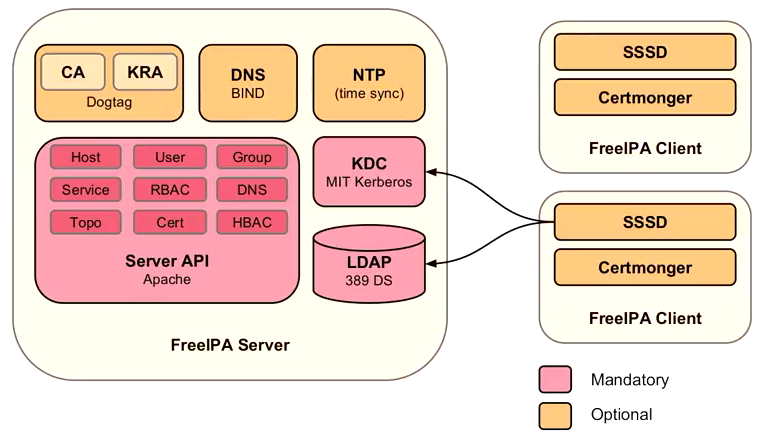
FreeIPA is an integrated security information management solution combining 389 Directory Server, MIT Kerberos, NTP, DNS, Dogtag certificate system, SSSD and others.
For a quick introduction to FreeIPA, you can read this Red Hat article about the FreeIPA history.
There are two main installation procedures. One involves a master DNS server creation, the other doesn’t.
In this tutorial, we assume that there isn’t any existing master DNS server and we will create one. This is the Red Hat preferred procedure with DNS integration.
In this tutorial the FreeIPA server hostname is ipaserver.example.com with an ip address of 192.168.1.51 set in the /etc/hosts file as follows:
192.168.1.51 ipaserver.example.com ipaserver
Note1: The IP address must be followed by the Full Qualified Domain Name (FQDN) and optionally some aliases, but not the other way around. Otherwise, Kerberos will not work!
Note2: FreeIPA does not support /32 networks. Try to use /24 instead (source).
Installation procedure
Install the main packages:
# yum install -y ipa-server bind bind-dyndb-ldap
Start the installation script:
# ipa-server-install The log file for this installation can be found in /var/log/ipaserver-install.log ============================================================================== This program will set up the IPA Server. This includes: * Configure a stand-alone CA (dogtag) for certificate management * Configure the Network Time Daemon (ntpd) * Create and configure an instance of Directory Server * Create and configure a Kerberos Key Distribution Center (KDC) * Configure Apache (httpd) To accept the default shown in brackets, press the Enter key. WARNING: conflicting time&date synchronization service 'chronyd' will be disabled in favor of ntpd Do you want to configure integrated DNS (BIND)? [no]: yes Existing BIND configuration detected, overwrite? [no]: yes Enter the fully qualified domain name of the computer on which you're setting up server software. Using the form <hostname>.<domainname> Example: master.example.com. Server host name [ipaserver.example.com]: ipaserver.example.com Warning: skipping DNS resolution of host ipaserver.example.com The domain name has been determined based on the host name. Please confirm the domain name [example.com]: example.com The kerberos protocol requires a Realm name to be defined. This is typically the domain name converted to uppercase. Please provide a realm name [EXAMPLE.COM]: EXAMPLE.COM Certain directory server operations require an administrative user. This user is referred to as the Directory Manager and has full access to the Directory for system management tasks and will be added to the instance of directory server created for IPA. The password must be at least 8 characters long. Directory Manager password:mypasswordPassword (confirm):mypasswordThe IPA server requires an administrative user, named 'admin'. This user is a regular system account used for IPA server administration. IPA admin password:adminipaPassword (confirm):adminipaDo you want to configure DNS forwarders? [yes]: yes Enter the IP address of DNS forwarder to use, or press Enter to finish. Enter IP address for a DNS forwarder: 8.8.8.8 DNS forwarder 8.8.8.8 added Enter IP address for a DNS forwarder: Do you want to configure the reverse zone? [yes]: yes Please specify the reverse zone name [1.168.192.in-addr.arpa.]: 1.168.192.in-addr.arpa. Using reverse zone 1.168.192.in-addr.arpa. The IPA Master Server will be configured with: Hostname: ipaserver.example.com IP address: 192.168.1.51 Domain name: example.com Realm name: EXAMPLE.COM BIND DNS server will be configured to serve IPA domain with: Forwarders: 8.8.8.8 Reverse zone: 1.168.192.in-addr.arpa. Continue to configure the system with these values? [no]: yes The following operations may take some minutes to complete. Please wait until the prompt is returned. Configuring NTP daemon (ntpd) [1/4]: stopping ntpd [2/4]: writing configuration [3/4]: configuring ntpd to start on boot [4/4]: starting ntpd Done configuring NTP daemon (ntpd). Configuring directory server (dirsrv): Estimated time 1 minute [1/38]: creating directory server user [2/38]: creating directory server instance [3/38]: adding default schema [4/38]: enabling memberof plugin [5/38]: enabling winsync plugin [6/38]: configuring replication version plugin [7/38]: enabling IPA enrollment plugin [8/38]: enabling ldapi [9/38]: configuring uniqueness plugin [10/38]: configuring uuid plugin [11/38]: configuring modrdn plugin [12/38]: configuring DNS plugin [13/38]: enabling entryUSN plugin [14/38]: configuring lockout plugin [15/38]: creating indices [16/38]: enabling referential integrity plugin [17/38]: configuring certmap.conf [18/38]: configure autobind for root [19/38]: configure new location for managed entries [20/38]: configure dirsrv ccache [21/38]: enable SASL mapping fallback [22/38]: restarting directory server [23/38]: adding default layout [24/38]: adding delegation layout [25/38]: creating container for managed entries [26/38]: configuring user private groups [27/38]: configuring netgroups from hostgroups [28/38]: creating default Sudo bind user [29/38]: creating default Auto Member layout [30/38]: adding range check plugin [31/38]: creating default HBAC rule allow_all [32/38]: initializing group membership [33/38]: adding master entry [34/38]: configuring Posix uid/gid generation [35/38]: adding replication acis [36/38]: enabling compatibility plugin [37/38]: tuning directory server [38/38]: configuring directory to start on boot Done configuring directory server (dirsrv). Configuring certificate server (pki-tomcatd): Estimated time 3 minutes 30 seconds [1/22]: creating certificate server user [2/22]: configuring certificate server instance [3/22]: stopping certificate server instance to update CS.cfg [4/22]: disabling nonces [5/22]: set up CRL publishing [6/22]: starting certificate server instance [7/22]: creating RA agent certificate database [8/22]: importing CA chain to RA certificate database [9/22]: fixing RA database permissions [10/22]: setting up signing cert profile [11/22]: set certificate subject base [12/22]: enabling Subject Key Identifier [13/22]: enabling CRL and OCSP extensions for certificates [14/22]: setting audit signing renewal to 2 years [15/22]: configuring certificate server to start on boot [16/22]: restarting certificate server [17/22]: requesting RA certificate from CA [18/22]: issuing RA agent certificate [19/22]: adding RA agent as a trusted user [20/22]: configure certificate renewals [21/22]: configure Server-Cert certificate renewal [22/22]: Configure HTTP to proxy connections Done configuring certificate server (pki-tomcatd). Configuring Kerberos KDC (krb5kdc): Estimated time 30 seconds [1/10]: adding sasl mappings to the directory [2/10]: adding kerberos container to the directory [3/10]: configuring KDC [4/10]: initialize kerberos container [5/10]: adding default ACIs [6/10]: creating a keytab for the directory [7/10]: creating a keytab for the machine [8/10]: adding the password extension to the directory [9/10]: starting the KDC [10/10]: configuring KDC to start on boot Done configuring Kerberos KDC (krb5kdc). Configuring kadmin [1/2]: starting kadmin [2/2]: configuring kadmin to start on boot Done configuring kadmin. Configuring ipa_memcached [1/2]: starting ipa_memcached [2/2]: configuring ipa_memcached to start on boot Done configuring ipa_memcached. Configuring ipa-otpd [1/2]: starting ipa-otpd [2/2]: configuring ipa-otpd to start on boot Done configuring ipa-otpd. Configuring the web interface (httpd): Estimated time 1 minute [1/14]: setting mod_nss port to 443 [2/14]: setting mod_nss password file [3/14]: enabling mod_nss renegotiate [4/14]: adding URL rewriting rules [5/14]: configuring httpd [6/14]: setting up ssl [7/14]: setting up browser autoconfig [8/14]: publish CA cert [9/14]: creating a keytab for httpd [10/14]: clean up any existing httpd ccache [11/14]: configuring SELinux for httpd [12/14]: configure httpd ccache [13/14]: restarting httpd [14/14]: configuring httpd to start on boot Done configuring the web interface (httpd). Applying LDAP updates Restarting the directory server Restarting the KDC Restarting the certificate server Configuring DNS (named) [1/11]: adding DNS container [2/11]: setting up our zone [3/11]: setting up reverse zone [4/11]: setting up our own record [5/11]: setting up records for other masters [6/11]: setting up CA record [7/11]: setting up kerberos principal [8/11]: setting up named.conf [9/11]: restarting named [10/11]: configuring named to start on boot [11/11]: changing resolv.conf to point to ourselves Done configuring DNS (named). Global DNS configuration in LDAP server is empty You can use 'dnsconfig-mod' command to set global DNS options that would override settings in local named.conf files Restarting the web server ============================================================================== Setup complete Next steps: 1. You must make sure these network ports are open: TCP Ports: * 80, 443: HTTP/HTTPS * 389, 636: LDAP/LDAPS * 88, 464: kerberos * 53: bind UDP Ports: * 88, 464: kerberos * 53: bind * 123: ntp 2. You can now obtain a kerberos ticket using the command: 'kinit admin' This ticket will allow you to use the IPA tools (e.g., ipa user-add) and the web user interface. Be sure to back up the CA certificate stored in /root/cacert.p12 This file is required to create replicas. The password for this file is the Directory Manager password
Note: If you want to set up the integrated DNS server, you need to also install the ipa-server-dns package then run the ipa-server-install –setup-dns command.
In some cases, adding the –allow-zone-overlap option can be needed (source).
Configure the firewall:
# firewall-cmd --permanent --add-service={ntp,http,https,ldap,ldaps,kerberos,kpasswd,dns}
success
# firewall-cmd --reload
success
Note1: With RHEL 7.2, new Firewalld FreeIPA configuration files have been created: freeipa-ldap and freeipa-ldaps (there is in fact a third one called freeipa-replication opening the port TCP 7389 but this tutorial isn’t about replication).
To open the ports for http-TCP 80, https-TCP 443, kerberos-TCP/UDP 88, kpasswd-TCP/UDP 464, ntp-TCP 123, ldap-TCP 389, type: # firewall-cmd –permanent –add-service freeipa-ldap
To open the ports for http-TCP 80, https-TCP 443, kerberos-TCP/UDP 88, kpasswd-TCP/UDP 464, ntp-TCP 123, ldaps-TCP 634, type: # firewall-cmd –permanent –add-service freeipa-ldaps
Note2: In any of the two new configuration files, no dns service is specified.
By default, a self-signed certificate has been created (see Dogtag Certificate System). But it is also possible to use an external certificate (see the Red Hat documentation).
Source: RHEL 7 Linux Domain Identity Authentication and Policy Guide.
Additional Resources
Jakub Hrozek‘s blog offers interesting articles about FreeIPA and SSSD.
Fraser Tweedale from Red Hat gives a global overview of FreeIPA: Open Source identity management (25min/2014).
Sander van Vugt provides a video about Configuring your own LDAP server using FreeIPA (59min/2016).
The Lisenet website offers a tutorial about Setting up a FreeIPA Server on RHEL 7.
Dmitri Pal, Red Hat director of engineering, offers a presentation about Identity Management.
The planet.freeipa.org blog provides some interesting information concerning the FreeIPA component.
The Digital Ocean website also explains How To Set Up Centralized Linux Authentication with FreeIPA on CentOS 7.
The Linux Journal published articles about integrating FreeIPA with Active Directory and using a REST interface for FreeIPA.
During the 2016 DevConf.cz, Thorsten Scherf from Red Hat offered a workshop about FreeIPA 4.3. The first part of the recording is here and the second part here.
Fraser Tweedale presents an update about the FreeIPA project (10min/2017).
The Red Hat portal provides an article describing how to test new features of Identity Management in RHEL 7.1.
The Itzgeek website provides a tutorial about Configuring a FreeIPA server on CentOS 7.
The Computingforgeeks website wrote a tutorial about Install a FreeIPA server on CentOS 7.
Red Hat offers a FreeIPA workshop on Github.
The Linuxtechi website offers a tutorial about Installing and Configuring a FreeIPA on CentOS 7 Server.
The HowToForge website provides a tutorial about Installing a FreeIPA Server on CentOS 7.
The Linux Guide and Hints website provides an article to prepare for the Red Hat Certified Specialist in Identity Management exam (EX362).
Apparently there is no ldap server in ipa-server as an rpm query revealed.No slapd etc…..Am i missing anything?
There is no OpenLDAP server in FreeIPA but there is a LDAP server, it is called 389.
As of RHEL7.2 you dont have to download the bind packages seperately.Ipa-server requires you to install ipa-server-dns package which includes the above bind packages and an extra one.
Also before hitting ipa-server-install make sure that in /etc/hosts there is no entry for your server (ie server1.example.com etc),otherwise the installation will fail towards the end.
Also set your dns server to be 127.0.0.1
Then you can proceed with the installation and it will be seamless. 🙂
Appendum:The ipa-server-install will prompt you for your server address during the installation process.Enter your address and hit enter twice.
OK.
Interesting. I will do some additional tests and update the tutorial. Thanks.
alamahant is right, on RHEL 7.2 you seem to need to install an ipa-server-dns package, otherwise you hit the following issue:
“ERROR: Integrated DNS requires ‘ipa-server-dns’ package”
However, this isn’t required on RHEL 7.0.
When I tried hooking up client to this server via ipa-client-install, the installation failed with a message saying server was not recognized as an IPA server. All the ports suggested to be open were open on both server and client.
I think I solved it, I brought up named on the server, and on the client edited /etc/hosts for the IP address and name of the IPA server. Not sure if I had to bring up named though.
It may look narcissistic when replying to my own reply, but this may help others:
– for whatever reason, when installing IPA server (at least on CentOS 7.2, maybe Red Hat is different), named is masked. You’ll have to unmask, enable and start it if you want a smooth installation on the client side.
– client side, you’ll have to list IPA server as your DNS server and also shut down the second NIC that you use to get internet connection from your home router. This ensures the client’s resolver writes in resolve.conf only stuff that it gets from IPA server and not from the home router. That way, ipa-client-install will be the smoothest install you have ever seen.
No, it’s not narcissistic to reply to your own comment. Your comment can indeed be very useful to others.
You don’t need to shut down any NICs – there’s a PEERDNS=no parameter.
I just did a setup of IPA server and thing works good if I run the ipa-getkeytab command on the IPA server but when I run it by adding nfs service to a different server, I get the following error
SASL Bind failed Can’t contact LDAP server (-1) !
ipa-getkeytab -s test1.example.com -p nfs/test1.example.com@EXAMPLE.COM -k /tmp/nfs.keytab is the exact command I gave. and while adding service, I did ipa service-add and gave nfs/test1.example.com
Any Idea as to where I making a mistake.
Probably you DNS is not working. Chk by pinging your ipa server from your client.
I have a problem when I try to ping an ipa server from a client machine, but from an IPA server I can ping the client machine. Can anyone give me a hint to resolve this. I use Virtual Box and rhel 7.0.
Hi 🙂
I tried a very quick ipa-server-install (followed by nothing as options) on a CentOS 7.3 virtual machine (with NAT network, static IP address and without any working DNS), my output goes as follows:
===============================================
Checking DNS domain idm.dongyl.cn., please wait …
Do you want to configure DNS forwarders? [yes]: yes
Following DNS servers are configured in /etc/resolv.conf: 10.0.18.1
Do you want to configure these servers as DNS forwarders? [yes]: no
Enter an IP address for a DNS forwarder, or press Enter to skip: 8.8.8.8
DNS forwarder 8.8.8.8 added. You may add another.
Enter an IP address for a DNS forwarder, or press Enter to skip:
Checking DNS forwarders, please wait …
Do you want to search for missing reverse zones? [yes]:
The IPA Master Server will be configured with:
Hostname: node1.idm.dongyl.cn
IP address: 10.0.18.30
Domain name: idm.dongyl.cn
Realm name: IDM.DONGYL.CN
BIND DNS server will be configured to serve IPA domain with:
Forwarders: 8.8.8.8
Forward policy: only
Reverse zone: No reverse zone
Continue to configure the system with these values? [no]:
===============================================
However, when I see this piece of output in this article, I’m confused:
===============================================
Do you want to configure the reverse zone? [yes]: yes
Please specify the reverse zone name [1.168.192.in-addr.arpa.]: 1.168.192.in-addr.arpa.
Using reverse zone 1.168.192.in-addr.arpa.
The IPA Master Server will be configured with:
Hostname: ipaserver.example.com
IP address: 192.168.1.51
Domain name: example.com
Realm name: EXAMPLE.COM
BIND DNS server will be configured to serve IPA domain with:
Forwarders: 8.8.8.8
Reverse zone: 1.168.192.in-addr.arpa.
===============================================
Does this mean you already have a working (external to IPA) DNS server and a reverse zone was setup beforehand ?
If no, where does the installer (ipa-server-install) grab the reverse zone ? To my best knowledge the reverse zone is manually configured other than generated automatically in anywhere.
You want Google (8.8.8.8) to serve your reverse zone 1.168.192.in-addr.arpa., which is obviously not going to work.
You need to set your own DNS server that provides the reverse zone and use it as a forwarder.
I don’t have 192.168.1.x – it’s not my setup, but the author’s. And that’s part of the reason for my questions. 🙂
To be simple, I was curious why, in the context of the article, 192.168.1.51 was reversely resolved by unknown DNS ? Because I saw this line:
Please specify the reverse zone name [1.168.192.in-addr.arpa.]:
1.168.192.in-addr.arpa. was “automatically” detected by the installer.
There is perhaps an error made in this tutorial. Personally, I felt that setting up a FreeIPA server was pretty complicated from a DNS point of view. On one hand, if you don’t set up an integrated DNS server during the installation, everything is simple but you lose some Kerberos features like service discovery. On the other hand, if you ask for creating an integrated DNS server, it starts fighting with any DNS infrastructure you’ve got (Bind, Dnsmasq, etc). And, in a virtualized world, it is difficult not to have any DNS infrastructure … Any idea to improve this tutorial is welcome.
I think I figured that out:
The ipa-server-install script tries to find if there’s an existing reverse zone already setup and visible to itself. If it finds it, the following process will create “No reverse zone”, because the reverse zone is actually there, not “missing”. If it can’t find one, it tries to ask user to create a new reverse zone (to be managed by IPA integrated Bind server) according to detected IP address of the current host – that is, “1.168.192.in-addr.arpa.” in this article.
I tested that out twice in my local environment. It seems to be right.
So there’s no error in the text, but there is misunderstanding about what the installer tries to do.
By the way, all the documentation that I can find out IPA/freeIPA installation, mentioned nothing about this, maybe the authors of those documentations should improve the work as well.
There is an error in the tutorial, as I cannot see how this reverse zone was ever meant to work.
It was a misunderstanding about “the reverse zone is supposed to work before IPA is installed”. The installer was trying to make a new reverse zone working, instead of using existing reverse zone. Please see my reply above and let me know if I’m wrong.
I’m with you now, yes, your reply above makes a lot of sense. Thank you.