Exchange Online

How to add permission for a mailbox folder in Exchange using PowerShell

This post is inspired from a question I answered over at the Microsoft Online Services Forum at TechNet.
http://social.technet.microsoft.com/Forums/msonline/en-US/a1e21764-0c10-4e6b-94e6-fd5df5df1ed2/how-to-add-multiple-users-permissions-to-a-calendar-using-powershell?forum=onlineservicesexchange#dcd3af6e-7f50-4faf-9da8-cbe6d905d7a3

The case was something like this.

I have an organization that was recently setup in Exchange Online and they have unique circumstances in that every user in the organization needs “reviewer” access to every other users calendars.  I cannot change the default permission since new users added after this should not be able to see these calendars details.

Lets use PowerShell and prepare for such a deployment.

First I create two security groups. One containing the users that will have their mailboxes shared, and on that has access to these mailboxes. The names I have used there is complete conceptual, so in your production environment you probably your name them a bit more specific.

New-DistributionGroup -Type Security -Name "SG Users With Shared Calendar" -Alias "SG-Users-With-Shared-Calendar"
New-DistributionGroup -Type Security -Name "SG Users With Access To Shared Calendar" -Alias "SG-Users-With-Access-To-Shared-Calendar"

Then, we need to add the affected mailboxes to their respective groups. I just used Exchange admin center for this task, but there is of course possible to do the same using PowerShell and the Add-DistributionGroupMember CMDlet

Next single liner command to run is to give the second group access to the first groups calendar.

Get-DistributionGroupMember -Identity "SG Users With Shared Calendar" | foreach {Add-MailboxFolderPermission -Identity "$($_.Name):\Calendar" -User "SG-Users-With-Access-To-Shared-Calendar" -AccessRights Reviewer}

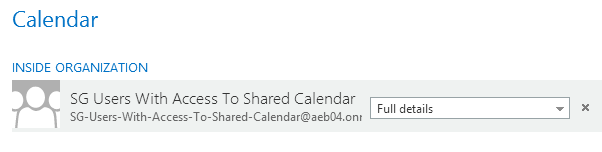
If you check the permission for a calendar owned by one of the users in the first group, you will see that it’s shared with our last security group

The script and way to solve this could of course be mixed up with both security groups and users to achieve the exact desired configuration, and apply to both Exchange Online and Exchange on-premises.

Below you find links to all the PowerShell CMDlets used in this post

Making a mailbox shared

When working with SMB customers without a clear IT strategy on how to store communication data between customers, you, at least I, get this question allot.

Hi,

Alex Darrow, who works as a project manager, quit!

He have removed all personal email from his mailbox, and now we want to give Anne Wallace and Sara Davis access to his mailbox.

Can you fix?

Of course I can! What I will do is to convert his mailbox into a shared mailbox, and grant the two users access to it. My first tool will be PowerShell.

Sing in to Exchange Online using PowerShell

$UserCredential = Get-Credential

$Session = New-PSSession -ConfigurationName Microsoft.Exchange -ConnectionUri https://outlook.office365.com/powershell-liveid/ -Credential $UserCredential -Authentication Basic -AllowRedirection

Import-PSSession $Session

Then some magic. With the Set-Mailbox command, I’m converting this mailbox into a shared one

Get-Mailbox -Identity "Alex Darrow " | Set-Mailbox -Type Shared

This task could take some seconds/minutes, so just be patient.

Then I sign in Exchange Admin Center, and check that the account shows under Shared. The great thing about shared mailboxes is that they do not need an Exchange Online license.

Therefore, I sign to Office 365 admin center and remove the license from the user.

When I click save, and then confirm with Yes, I get a warning saying that all data will be removed.

I have still not experienced that a regular mailbox that has been converted to a shared mailbox loses any data when the license is removed, so I click Yes.

Now I rename the account from within Office 365 admin center. This is not required, but it makes management easier later on when accounts have a logical name. I usually append “- Shared” in the Display Name, and just “Shared” in the user name. It’s short and logical.

Then, as a final step, I assign the access rights for the mailbox. I do this via PowerShell, but I could have done just as easy from Exchange Admin Center

Get-Mailbox -Identity "Alex Darrow - Shared" | Add-MailboxPermission -User "Anne Wallace" -AccessRights FullAccess -InheritanceType All

Get-Mailbox -Identity "Alex Darrow - Shared" | Add-MailboxPermission -User "Sara Davis" -AccessRights FullAccess -InheritanceType All

Then ask one of the users to try opening the mailbox. If they use Outlook Web App, they have to manually Open another mailbox

If they are using Office 365 ProPlus, the mailbox is automatically opened next time Outlook starts.

A few notes

The Exchange Online Limits document in the Office 365 Service Description states that a Shared Mailbox only have 10GB of storage, and that it required a license to use futures like Online Archive. However, when you create a new Shared Mailbox, it’s ProhibitSendReceiveQuota is set to 50GB. Therefore, remember to configure this, so you don’t get unexpected NDR reports down the road.
http://technet.microsoft.com/en-us/library/exchange-online-limits.aspx#StorageLimits

Remember to remove the SMTP address from the mailbox, unless you want to risk getting personal mail addressed to Alex.
http://technet.microsoft.com/en-us/library/bb123794(v=exchg.150).aspx

One final thing, which is a tip many should use more often. Always make sure to have a copy of important data before changing stuff in a production environment. Although, in this case Microsoft would be able to restore your data if you should loose anything, by making a Service Request, it gives a extra good feeling knowing that: If I screw up this, I will be able to fix it 🙂

Microsoft Cloud services and PowerShell

This is probably one of the most blogged topics, so this post is mostly a helper for myself; to document how to access the different Online and Cloud services from Microsoft via PowerShell.

Windows Azure Active Directory is easy

$MsolCredential = Get-Credential
Connect-MsolService -Credential $MsolCredential

Windows Azure has multiple ways of doing it, but for quick access just

Add-AzureAccount

Exchange Online is a bit longer

# Set credentials
$UserCredential = Get-Credential

# Configure Session
$Session = New-PSSession -ConfigurationName Microsoft.Exchange -ConnectionUri https://outlook.office365.com/powershell-liveid/ -Credential $UserCredential -Authentication Basic -AllowRedirection

# Import Session
Import-PSSession $Session

# Prefix trick when importing Session
Import-PSSession $Session -Prefix "EO"

# Turns for example Get-Mailbox into Get-EOMailbox. Could get handy
# Exit Session
Remove-PSSession $Session

SharePoint Online is no pain at all

Connect-SPOService -Url https://contoso-admin.sharepoint.com -credential admin@contoso.com

Lync Online is more like Exchange

$credential = Get-Credential

$session = New-CsOnlineSession -Credential $credential

Import-PSSession $session

Remove-PSSession $session