Month: November 2013

An Error occured during Logon

Received the strangest case on my desk today. A user was unable to sing in to the internal SharePoint site. When the user tried to logon via UAG everything worked fine.

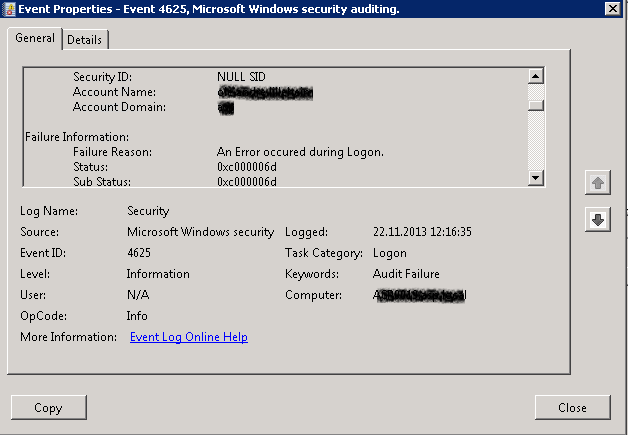
On the SP server quickly found a lot of these events.

Account For Which Logon Failed:
  Security ID: NULL SID
  Account Name: Username
  Account Domain: Domain
Failure Information:
  Failure Reason: An Error occured during Logon.
  Status: 0xc000006d
  Sub Status: 0xc000006d

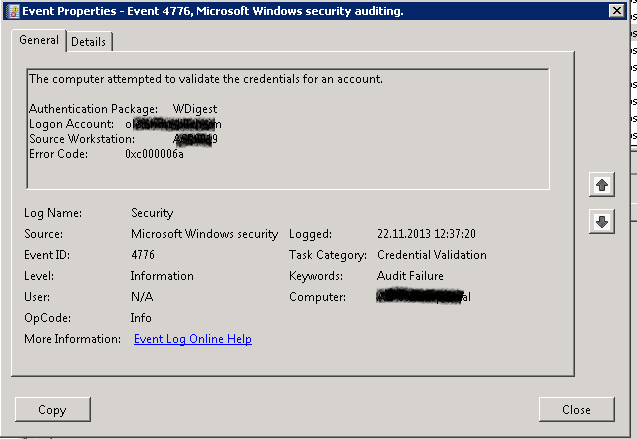
Binging that did not help much, so I turned to my Security log from the domain controllers, and found a much more helping event.

There it was, the event stated that the credentials was invalid.

The computer attempted to validate the credentials for an account.
  Authentication Package: WDigest
  Logon Account: Username
  Source Workstation: SomeServerName
  Error Code: 0xc000006a

Strange, as the user was both able to logon via UAG and start a VPN connection. Well, trust the DC I thought, and opened ADUC and reset the users password to the same password as before and guess what? It worked!!

How this is possible, I do not now, but if I find the time, I will for sure dig into it.

Windows Azure Virtual Machine hangs in “Starting” state

Once one and then you might experience that your VM hangs with the status “Starting”.

This is really frustrating as you do not have a force power off button in the Azure GUI.

This is where PowerShell is your savior.

Open a Windows Azure PowerShell window, and connect to your subscription. The run this command

Stop-AzureVM -Name YourVMName -ServiceName YourServiceName -Force

Force is the keyword here. Give it some seconds, and the VM should stop. Now, you can try to start it again.

For more on this command, and Azure Powershell in general, visit http://msdn.microsoft.com/en-us/library/jj152831.aspx

Error when changing the Locale settings in SharePoint Online

Today, when I tried to change the locale settings for my public facing website, I received the following error.

The column “Site Element Id” in the list or library “Site Elements” has been marked for indexing

To work around this, just do as you’re told.

Open settings for the Site Elements list. Open the Site Elements Id column, set “Enforce unique values” to No, and click OK.

Back on the settings page, click Indexed columns, then click Site Elements Id, and then click Delete.

Go back to Regional Settings under Site Settings, and try to change the Locale settings again. This time it should work.

Remember to reconfigure the indexed column, and set “Enforce unique values” to Yes on the Site Element Id column.

Change the style for your Office 365 site

This is quite fun, and it really shows the power of theming in SharePoint. Sense I’m no CSS and HTML guru anymore, I’m just going to personalize one of the themes that comes with SharePoint Online.

Simply begin by clicking the gear in the upper left corner, and select Change the look.

The Change the look page has many themes you can spin off from. My personal favorite is the Ink theme. I also like the grey color, and the Tokyo layout is just great. When you are done editing, just hit Try it out.

If you then like what you see, press Yes, keep it. If your eyes are in pain, hit No, not quite there, and try over again.
Well, then you are done. Press Home, and refresh your browser if something looks wrong.

Create your own Office 365 hosted blog

Open your public facing SharePoint Online website. It should be something like yoursubscriptionname-public.sharepoint.com.
By default, your public facing website is showing you something like this

First of all, we should do something about those directions and contact pages. Just delete the pages that you do not want. For me, Contact us and Direction has no interest, as they don’t have much to do with blogging. Go to the page, press the PAGE butting, and then Delete Page. Confirm, and you are done.

The Abous us, page is going to become the About me page. Nice, huh?

Open About us, click PAGE, then Edit Properties, and change Name to About-me and Title to About me. Keep the rest as demo data, and click Save. Finally click EDIT LINKS and rename the link to About me. You could also move the Blog link to the left. It’s more logical I think. Press Save.

Now, we are going to change the default home page to the blog post roll. Open Site Settings, go to Look and Feel and press Welcome Page.
On the Welcome Page, press Browse…, select Blog.aspx, and press Insert, and then OK

You do not need the default page anymore, so you can now go to Site Contents and delete it if you like.
As the final task for now, we are going to change the Website title, and optionally the logo. Standing in your home page, klikk SITE, and Edit Title. Type something catching, and click OK

And now, you got your own Office 365 blog. In the nest blog post, I’m going through the process of styling the blog. Stay tuned 